
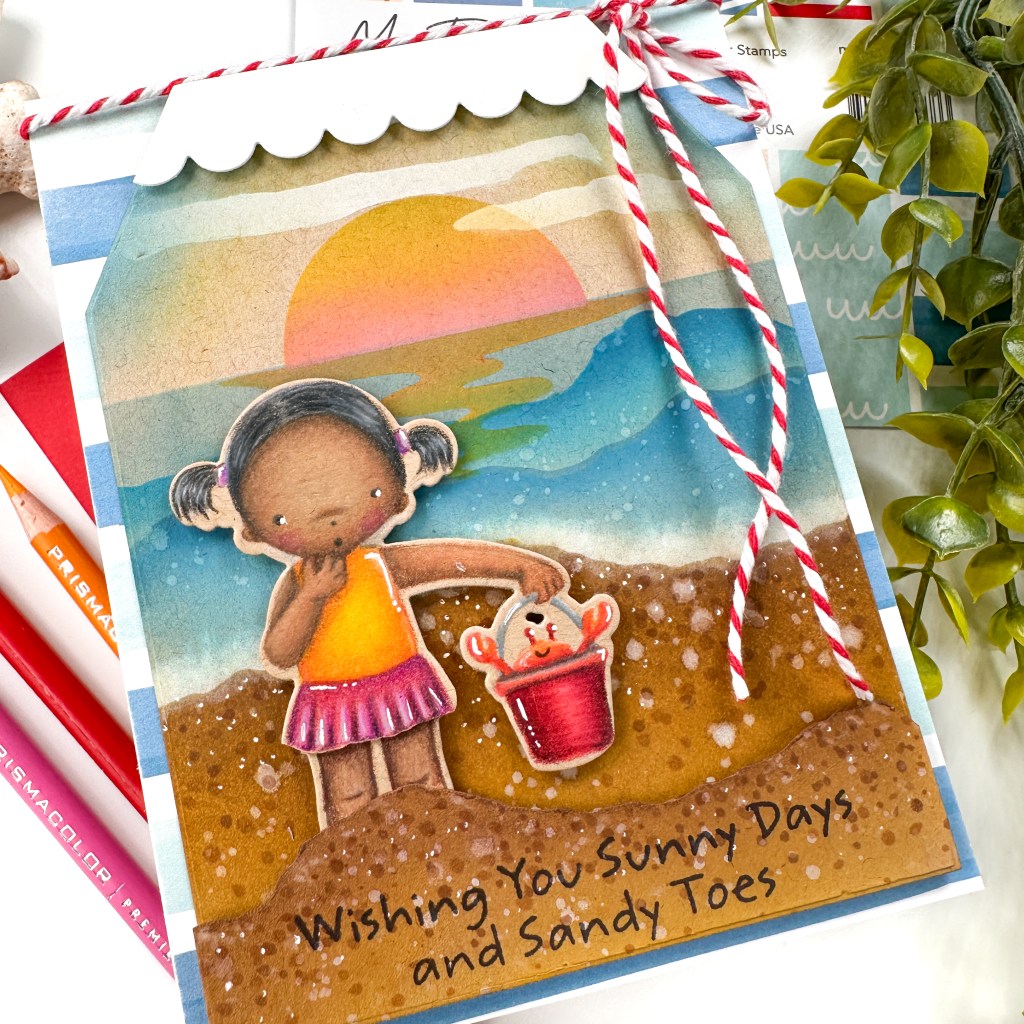
One more day until the new release goes live! Are there any sets that you have your eye on? Today’s card features a new stamp set from Pure Innocence called PI Sunny Days and Sandy Toes. I combined it with a previously released stencil that I haven’t had a chance to use yet, Build-a-Beach Stencil.

STEP-BY-STEP INSTRUCTIONS
- Trim a panel of patterned paper from MSTN Sand, Surf, & Sky Paper Pad and adhere to an A2 card base.
- Using Blueprints 9, die cut a piece of white and kraft cardstock using the largest tag shaped die.
- With the white panel, use the scalloped die in Blueprints 9 to cut a little top border. Set aside.
- On the Kraft die cut, stencil a beach scene using Build-a-Beach Stencil. Each edge of the stencil allows you to stencil a different portion of the scene. The stencil is labeled.
I started by ink blending the sandy beach. I used brown dye ink at the top then added mustard seed distress oxide ink from the bottom and sides. I knew I wanted to hide the little girl’s legs because I did not like my coloring on the bottom portion. So on a scrap piece of Kraft, I stenciled the beach again in the same manner. I fussy cut it out and popped it up with foam tape for dimension. I love the layered look. I splattered the beach with diluted white ink and water. I also used two brown copics to dot in more texture. Stamp a sentiment on the bottom before adhering the layered sand portion. On the tag base, I added “sea foam” with white pigment ink and q-tip.
Next, I used the edge for shallow water and deep water using two different distress oxide inks. For the shallow water, I used salty ocean and mermaid lagoon and a little uncharted mariner for the deep water. For the horizon, I used tumbled glass distress oxide ink.
I ink blended the reflection in the water with mustard seed and carved pumpkin oxide inks. The sun is the same colors with a little picked raspberry at the bottom. The clouds used white pigment ink. And I blended around the edges with left over blue ink on my brush. - Pop up the top border with foam tape and adhere to the tag.
- Stamp the little girl from PI Sunny Days and Sandy Toes in light brown ink. Color with a variety of prisma colored pencils. Die cut with the coordinating die-namics.
- Adhere the image with foam tape and tuck her behind a sand dune.
- Adhere the finished tag to the card base and embellish with a piece of twine.
I’m happy how this fun card turned out. I think the stencil is a good one for your stash. Thank you so much for checking out my blog! Enjoy your day.
For more inspiration, tutorials, and a closer look at MFT products, please stop by and subscribe to the MFT YouTube channel!
Happy crafting,
Tiffany
I’d love to connect with you! Please follow me on IG and my blog, and reach out and say hi!
@ink.therapy.designs

Gorgeous card with your techniques. Is the sun’s reflection a stencil? It’s great!!!!
LikeLiked by 1 person
Thanks so very much for commenting! Yes, the whole background scene was built with the stencil linked in my post. The stencil is a great one for your stash as it packs in quite a bit on one stencil.
LikeLike
Love, love this card, Your little girl is so sweet and that crab in the bucket is just too cute!!! Makes me wish I was at the beach right now! There is nothing better than hearing the waves (but I am boujie! I need to be on a covered deck with lots of fans and not in the sand!) ;-). Kim in Tx
LikeLiked by 1 person
HAHAH! I’ll be sitting right there with ya, beach adjacent LOL. Thanks so much for your love!
LikeLiked by 1 person