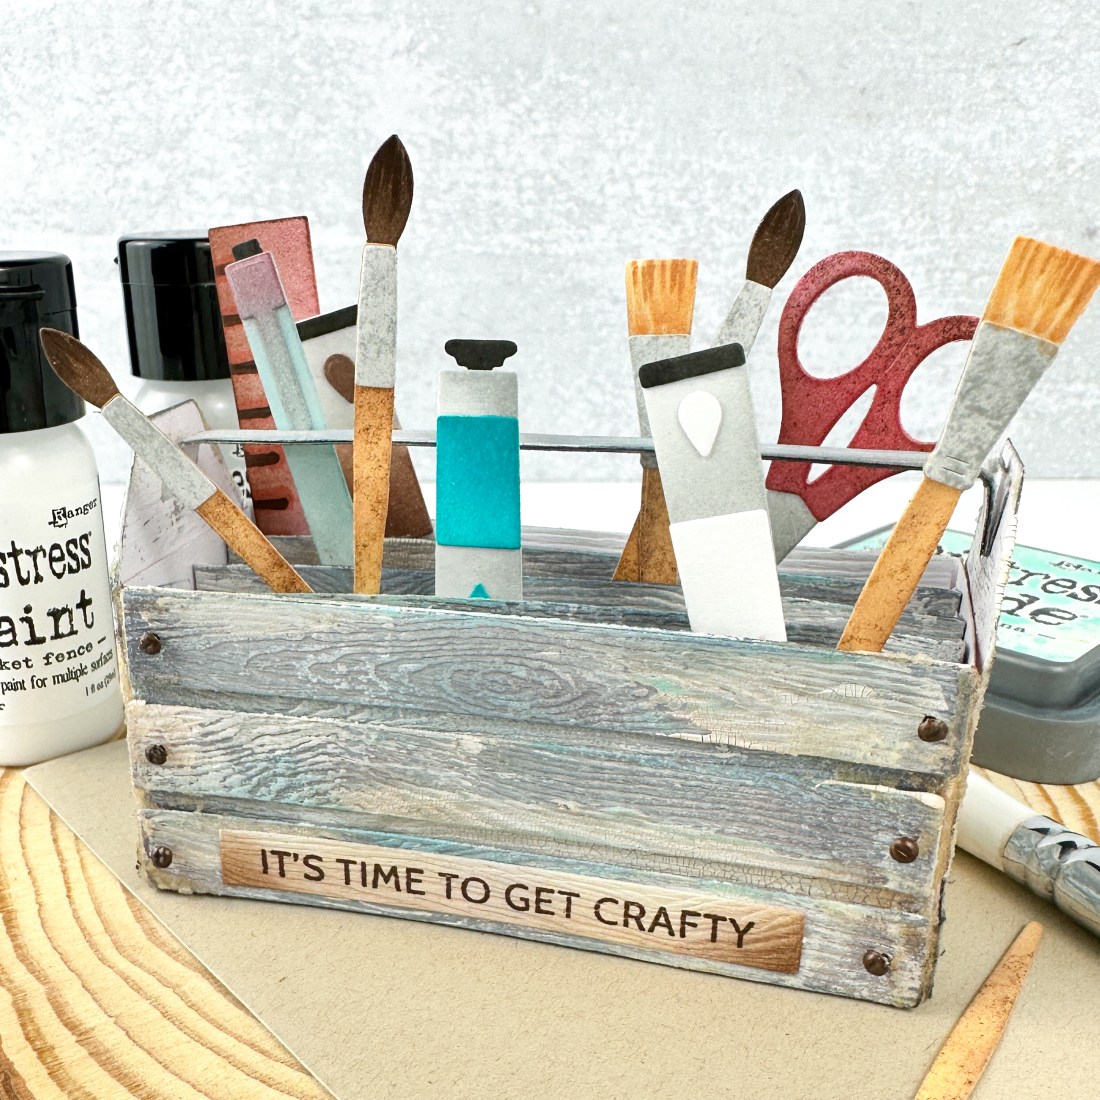
Happy Friday, friends! I hope you’ve been enjoying all of the great inspiration so far. Today, I made a dimensional “box” card using the Cool Caddy Die-namics. I don’t normally do these types of cards, so it is always fun to try something different. I spent a lot of time distressing the card for that faux, patina wood look. There were several steps and products I used. But you don’t have to! The caddy looks amazing even with plain cardstock too. So please don’t think you have to do all of these steps to get a great result. I wanted to practice my distressing skills. 🙂 Let me know if you want me to do a video sharing each step.

STEP-BY-STEP INSTRUCTIONS
- Die cut and color the caddy. Remember, that drying between each step is very important to layering mediums.
- Starting with Tim Holtz Distress Woodgrain Cardstock, die cut all of the pieces of the caddy. Make sure to pay attention to the direction of the grain for each piece you die cut if you want the grain to go the same way. Starting with woodgrain cardstock builds in that wood like texture from the beginning. The extra steps just bump up the detail, texture, and design.
- Due to the nature of mixed media, no two pieces look alike. So it is important to work on all pieces of the caddy at the same time if you want a more uniform look. I laid all die cuts on my Waffle Flower media mat so I could treat each piece at roughly the same time.
- Using a paint brush, paint Lost Shadow distress paint on each die cut. Dry.
- Using a paint brush, paint white distress paint, Picket Fence, haphazardly on each die cut. Try to brush lightly so you are only getting the raised areas. Dry.
- Using the ink pad in your hand, lightly scrape Hickory Smoke distress oxide ink over the die cuts and on the edges. Dragging the ink pad gives you random lines further enhancing the wood grain. Dry.
- Using a dry bristly blending brush, brush dark brown dye ink into the “knots” of the wood and on the edges randomly. I wanted to add some warmth back into the die cuts. Dry.
- Drag more Hickory Smoke distress oxide ink over the die cuts.
- Drag some Salvaged Patina distress oxide ink over the die cuts. Dry.
- Add some Black Soot distress oxide ink of the die cut edges. Dry.
- Add back in some white paint in areas that might need more highlight. Dry.
- For the three planks on the front of the caddy, use a hole punch to punch two holes on either side of each plank. Mimic nails by putting in hardware fastener brads.
- Put the caddy together following the instructions on the website. I used scor tape for most of the assembly so I did not have to wait for liquid glue to dry. Make sure you are laying the caddy flay while assembling and moving back and forth to ensure it bends enough to fit in a card.
- Using opaque crackle paste, add paste randomly over all of the die cuts. I used my fingers, but you can use a palette knife. Dry completely.
- Using sand texture paste, add over paste over the edges and between the planks on the front for additional texture. Dry completely.
- Die cut, color, and assemble the craft tools using Crafty Tools Die-namics. I die cut all tools from white cardstock and either ink blended or colored with copic markers. For that mottled, worn texture, I used a darker shade of ink and sponged the die cuts with a craft sponge. Here’s an Amazon link to the one I bought: Natural Sponge. I absolutely love that sponge texture.
- Glue in the tools throughout the box.
- Stamp a sentiment from Crafty Caddy on woodgrain cardstock and add some simple brown and gray ink on the sides. Adhere to the front of the caddy.


I really like how this turned out. I love the crackle paste. Even my husband was impressed. Hope I’ve inspired you to try a little distressing on your next make. Please let me know if you have any questions at all!
For more inspiration, tutorials, and a closer look at MFT products, please stop by and subscribe to the MFT YouTube channel!
Happy crafting,
Tiffany
I’d love to connect with you! Please follow me on IG and my blog, and reach out and say hi!
@ink.therapy.designs

Wonderful… I love all the distressing ❤️
LikeLiked by 1 person
Thanks so much for stopping by and commenting!
LikeLike