
Hope you had a chance to check out yesterday’s MFT Stamps release. There are so many adorable things! I just love this Gift Bag Die-namics. I think it is perfect for the holidays or any occasion. It can fit candy or other little treats or even a gift card. I definitely recommend picking this one up. It is very easy to assemble, but if you have any trouble, Libby went live on the MFT Youtube channel and Facebook page and assembled a sample at the end of the live.
STEP-BY-STEP INSTRUCTIONS
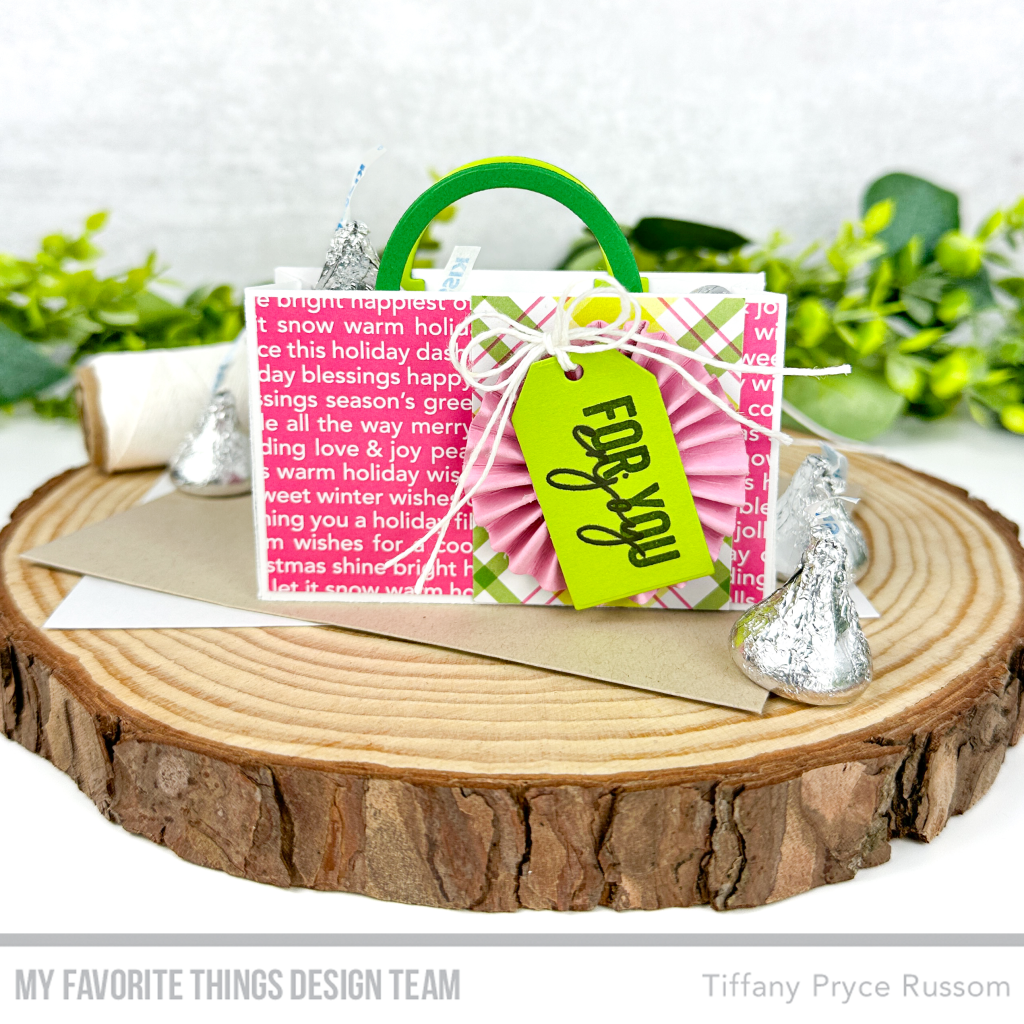
- Using the Gift Bag Die-namics and white cardstock, use the largest die to die cut the piece to make the bag walls. You must die cut it twice to get the two pieces. You can use one half sheet of 8.5×11 inch paper for both pieces if you place it properly. Using slightly thinner cardstock will ensure your creases stay sharp. If the cardstock is too heavy, the creases are more unwieldy and crack a little. It will works and looks good, but it is just something to keep in mind.
- Assemble the bag using scor tape. You can also use liquid glue, but with scor tape you do not have to wait for it to dry. Use a bone folder to reinforce all of the scored lines made by the die. Check out the release live to see how to put the bag together.
- Using the Colorful Christmas Text Paper Pad and the Gift Bag Die-namics, die cut the large rectangular shape. Trim it down a little and adhere to decorate the bag. Next, I used scraps of patterned paper from the Holiday Paper pad to further decorate the bag.
- Die cut the Rosette Die-namics from Cotton Candy cardstock. Use your paper trimmer to cut the strip in half. Accordion fold the scored lines and glue the pieces together. Die cut two small circle dies to hold the rosette together on either side. It is best to use hot glue, but I used scor tape and regular glue. It was a serious pain to get it to adhere and stay in the rosette shape, but it worked eventually.
- Die cut the handle from Field Day and Limelight cardstock. I die cut two in Field Day and two in Limelight so I could double up each handle.
- Die cut a tag using Limelight cardstock. Stamp a sentiment from Best Gift Ever. I slightly overlapped two sentiments.
- Embellish with twine, add your gift bag contents, and voila!

Thanks for stopping by my blog!
For more inspiration, tutorials, and a closer look at MFT products, please stop by and subscribe to the MFT YouTube channel!
Happy crafting,
Tiffany
I’d love to connect with you! Please follow me on IG and my blog, and reach out and say hi!
@ink.therapy.designs
