
(*Affiliate links used whenever possible at no extra cost to you.)
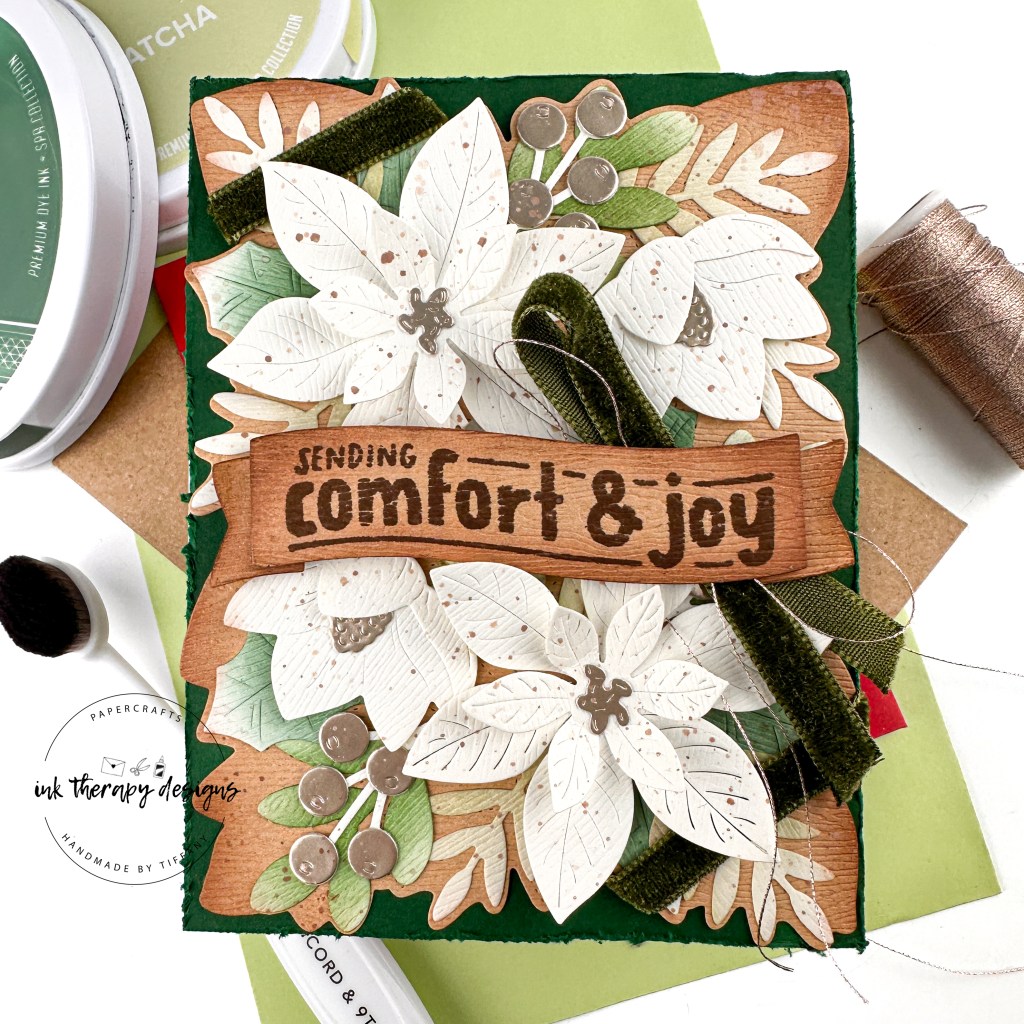
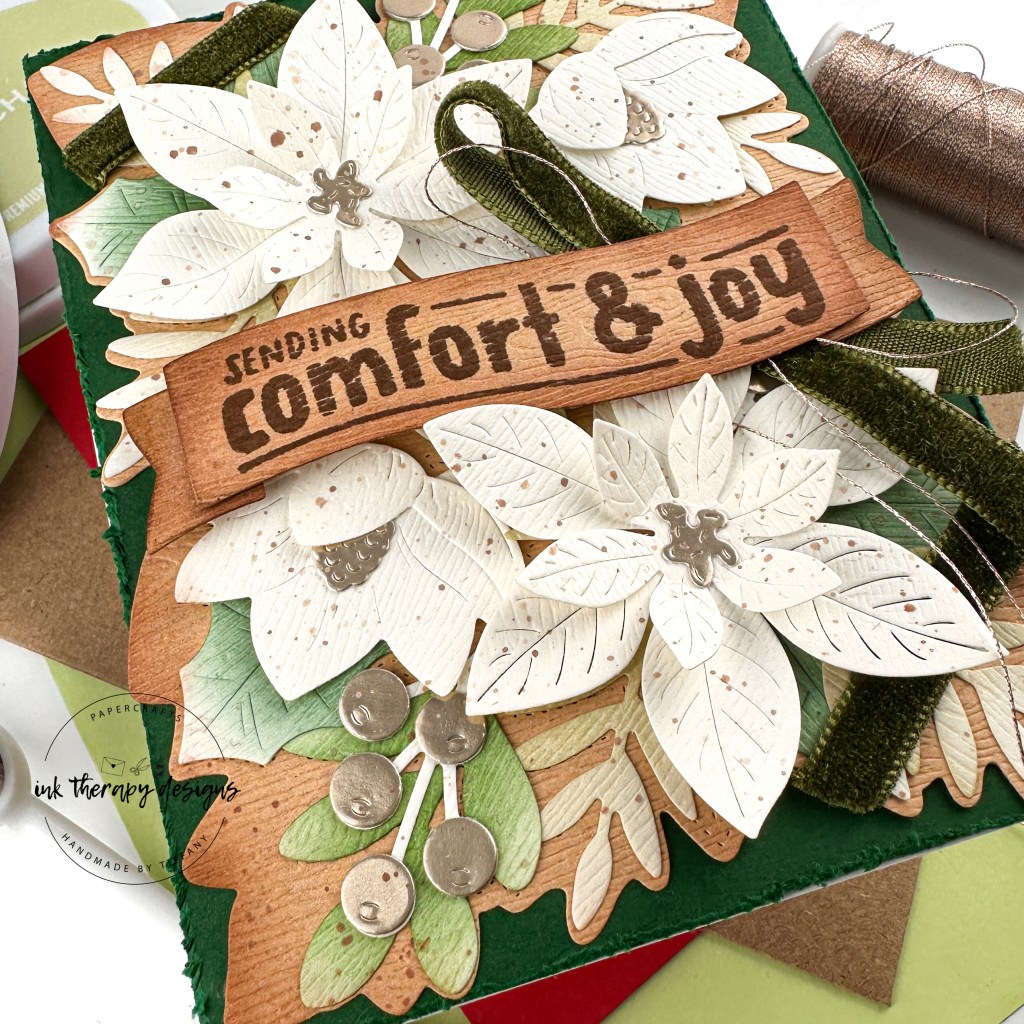
Hey friends! Long time, no blog. I am all good and doing just fine. I’ve taken a break and may be crafting a little less from now on. I’m not sure. I haven’t felt motivated lately, and it’s coming up on a busy season with family birthdays and the holidays. But I did just receive my recent order from Concord & 9th and had to create something with the gorgeous C9 Festive Blooms! I purchased this myself because I loved it so much. It is sold out many places, but Scrapbook.com still has some in stock at the time of me writing this. So hurry and order! Oh, and Scrapbook.com has a sitewide sale for the next 4 days, so it’s a win-win!
Product list:
Festive Blooms – Concord & 9th
Festive Blooms Stamps – Concord & 9th
Foil Paper, Champagne – Concord & 9th
Woodgrain cardstock – Lawn Fawn (I used cream and brown woodgrain cardstocks in my stash from Memory Box, but this could be an alternative)
Evergreen cardstock – Concord & 9th
Inks: Spruce, Matcha, Eucalyptus, Machiatto – Catherine Pooler Designs
This card was pretty easy to create. I wanted to keep this card a little more rustic with cream, brown, and greens. But I will certainly be using this set again in different color combos. BTW – my new favorite tool for creating color palettes is the Palette Scout. Check it out to learn more!
I die cut the background piece from brown woodgrain cardstock, and I die cut all the greenery and poinsettia leaves from cream woodgrain cardstock. I ink blended the leaves with a variety of green dye inks from Catherine Pooler. I die cut the flower centers and berries using Champagne foil cardstock. I used the back of the packaging as a guide as I glued all of the pieces down. I popped up the poinsettias and magnolia flowers with thin foam squares for a little added dimension. I also fluffed up the poinsettia leaves. For the sentiment, I die cut the banner using the same brown woodgrain cardstock, and stamped a sentiment from the coordinating stamp set with dark brown ink. It’s not a perfect stamp, but that is ok since I’m going for that woodgrain sign feel. I popped up the banner with three layers of foam tape. For some extra festive detail, I added dark green velvet trim, and a little champagne colored, metallic twine. Finally, I added some splatter, as is my nature. I mounted the card front on an A2 panel of Evergreen cardstock and distressed the edges before adhering to an A2 card base.
Thanks for taking a look and I hope you’re inspired to try something similar. Even if you don’t buy this exact die set, try using the florals in your stash to create a similar look. Do as I say, not as I do, LOL. I have SO much stuff in my stash that I’ve never used, but I’m working on it! 🙂 See you next time.
Happy crafting,
Tiffany
I’d love to connect with you! Please follow me on IG and my blog, and reach out and say hi!
@ink.therapy.designs
*Affiliate disclosure: I only use, review, and blog about products/companies I actually like and will continue to use. Some of the products shown on my blog use affiliate links. These affiliate links allow me to earn a small commission when products are purchased through those links. *This is at no cost to you!* Please do not feel obligated to use my affiliate links. If you choose to use these links, thank you so much! It helps support my blog and bring new content to you. Read the full disclosure on the about page.

This is absolutely incredible, Tiffany! I saw your card on Pinterest and had to come get a closer look. The colors and texture are stunning! Love everything about this!
LikeLiked by 1 person
You’re so kind, thank you! Glad you liked it 🙂
LikeLike
Stunning! I love everything about this card! It’s so WOW 😍!
LikeLiked by 1 person
Thanks my friend!!
LikeLike