(*Affiliate links used whenever possible at no extra cost to you.)
It’s my goal this year to enjoy holiday crafting and be more intentional. I think last year I spent so much time planning that I didn’t really get to making. And by the time I did, the holidays were nearly over. I want to slow down this year and carve out more time to use my ever growing holiday stash.
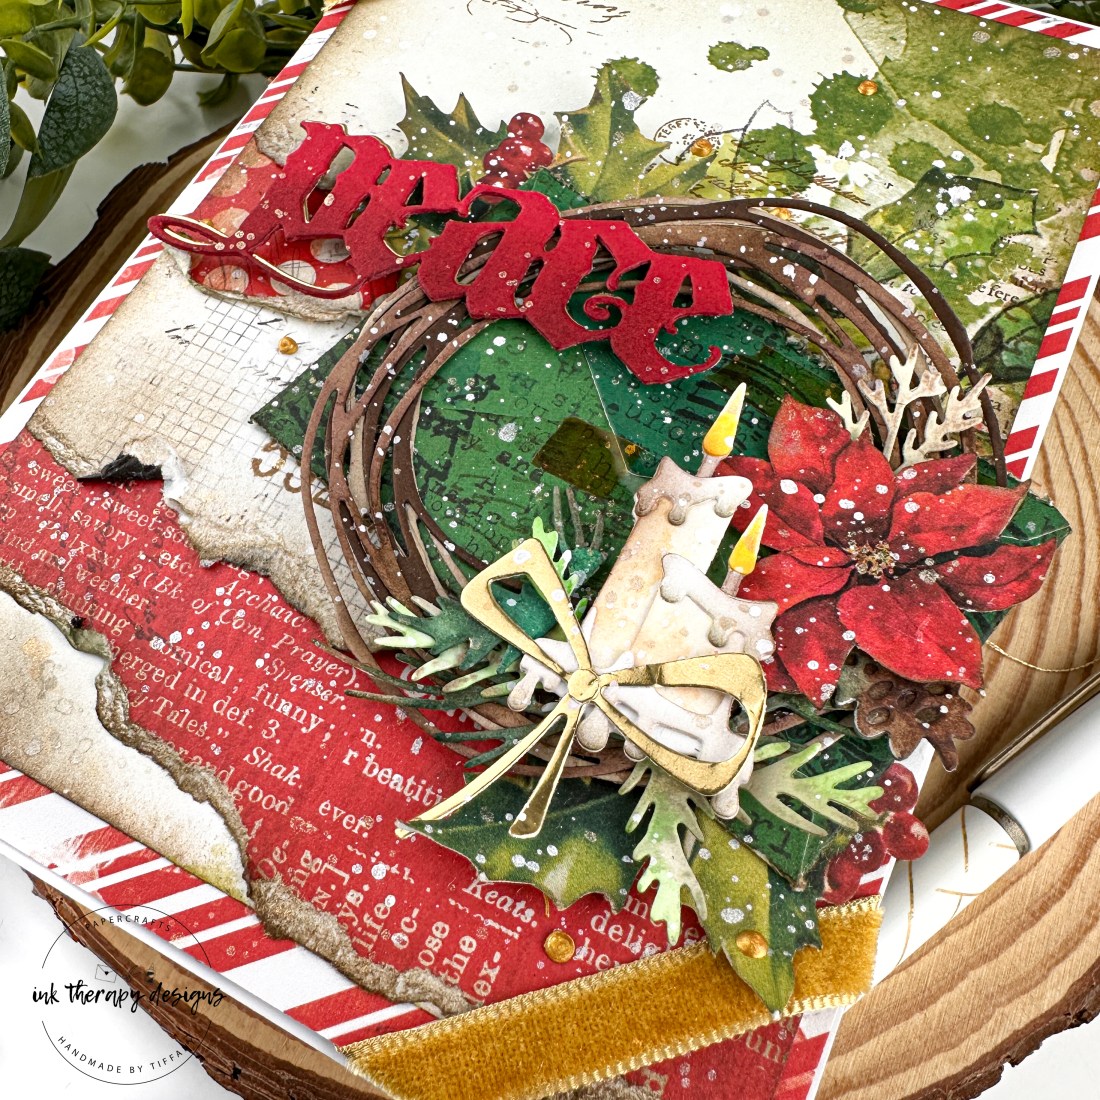
Sharing some simple steps on how I made this card in case you wanted more detail! It took a little time to come together, but it was not hard to do. I think these types of cards are some of my favorite to create. I love adding a little of this and a little of that and focusing on the details to create beautiful, but easy cards.

Main Product List:
- Christmas Spectacular 12×12 paper pack – 49 & Market
- Holiday Postmarks – Tim Holtz/Stampers Anonymous
- Postale Dies – Tim Holtz/Sizzix
- Vault Festive Wreath – Tim Holtz/Sizzix
- Vault Holiday Classic – Tim Holtz/Sizzix
STEP-BY-STEP INSTRUCTIONS
- Create a 5×7 inch, white card base.
- Trim a panel of scrap white cardstock down to about 4.75×6.75. This will be used as a base to adhere multiple pieces of patterned paper from Christmas Spectacular that were cut to the same size. I tore each pattern at a slight angle, roughed up the edges, and adhered them in layers. I also ink blended Vintage Photo archival ink around each piece of paper. This paper pack is absolutely gorgeous!! Definitely one of my favorites. I love the vintage, mixed media feel of it. And I love mixing patterns together.
- I added a few additional stamps on the paper using Holiday Postmarks. I stamped a few additional details in Vintage Photo archival ink. The patterned paper has a lot of detail and interest already, so I had to add very few extra stampings.
- Next, I worked on my focal images. I started by creating an envelope using a green patterned paper from Christmas Spectacular with the Postale die set. The Christmas Spectacular also has some envelope ephemera pieces that you can fussy cut out so this is also an alternative.
- Once the envelope was assembled, I ripped and distressed the top to make it look like an opened envelope. I added stamping using the Holiday Postmarks stamp set, and added a few pieces of Cello Sticker Tape.
- Underneath the envelope, I added ephemera elements (holly leaves) that I fussy cut from Christmas Spectacular. I inked the edges of the pieces with Vintage Photo and curled up the leaves a little.
- For the wreath, I used die cut several pieces from Vault Festive Wreath from distress watercolor paper and colored cardstock. For the pieces in white, I used a variety of inks to ink smoosh the die cut pieces. The poinsettia is also fussy cut ephemera from Christmas Spectacular. The bow is from brushed gold cardstock. Adhere all the pieces together to compose the wreath.
- Splatter everything with white ink. I always use Dr. Ph Martin’s Bleed Proof White, which you can find on Amazon or your art store.
- For the sentiment, I used Vault Holiday Classic. I die cut two layers from red cardstock and one layer from brushed gold and adhered them together, offsetting the gold a bit. On the top most layer, I ink blended Vintage Photo at the bottom fading up to give an ombre feel. Adhere with foam tape and liquid glue to ensure the die cut is even across the panel.
- Adhere the card front to another piece of patterned paper – the red and white stripes. And splatter with gold, metallic watercolor.
- Add a couple pieces of velvet trim warm on either side of the panel. Adhere on the back with scotch tape. Then adhere to whole thing to the card base. This velvet trim is a season favorite. I love the little bit of glam and texture it provides.
- Finally, embellish with some gold dots using Stamperia’s gold contour liner. The dots dry dimensional and matte.


I have a few more pics over on my IG. Hope you liked this card and are inspired to try something similar! Please reach out if you have any questions. Have a great weekend.
Happy crafting,
Tiffany
I’d love to connect with you! Please follow me on IG and my blog, and reach out and say hi!
@ink.therapy.designs
*Affiliate disclosure: I only use, review, and blog about products/companies I actually like and will continue to use. Some of the products shown on my blog use affiliate links. These affiliate links allow me to earn a small commission when products are purchased through those links. *This is at no cost to you!* Please do not feel obligated to use my affiliate links. If you choose to use these links, thank you so much! It helps support my blog and bring new content to you. Read the full disclosure on the about page.

So pretty!
LikeLiked by 1 person
I appreciate your kind comment! 🙂
LikeLike
Beautiful xx
LikeLiked by 1 person
Many thanks lovely!
LikeLiked by 1 person