
Project Overview
- Technique(s): die cutting, shaker card, heat embossing, laminator
- Product list:

Hi crafty friends! Remember when I reminded you to keep your scraps from my easy holiday card blog posts? Well, these two cards use those scraps! I’m showcasing more Waffle Flower products that have been sitting in my stash (I’ve been waiting until my holiday card frenzy to use them) and I’ve dubbed them “his and her” cards, although they’re great for any and everyone!


Merry Everything. Shakers and pattern play are two of my favorite things, so I loved the final card design for my “her” card. Using non traditional holiday colors of pink and green adds a bit of fun to your cardmaking as well. I started by cutting two A2 sized panels from pattern paper. I die cut the mint and teal striped paper with the Angled Stripe Panel Die. These products were meant to work together so it die cut perfectly. I also cut an A2 sized panel of pink polka dotted pattern paper from the Dots & Lines pad. I adhered my pink panel to a white card base and adhered acetate to the striped panel. For the “shake” (what do they call the inside bits? Someone please tell me in the comments below ha), I used a mix of white and silver sequin from my stash and added the pink and white trees (the positive die cut scraps) from my previous card. The little trees were a perfect addition because it tied the color story together and added a festive touch.
Pro tip: When making a shaker card, make sure that the walls of your shaker are thick enough to allow the “shake” to move around freely. You may have to double or triple up foam tap or use multiple layers of heavyweight cardstock. Also, don’t forget to lightly powder the inside shaker walls with your static powder tool to prevent the bits from sticking to the foam tape.
For the sentiment, I die cut ‘merry’ from white shimmer cardstock and stacked it on two layers of plain white die cuts for dimension. I used a positive piece from the striped die cut panel to stamp the sub-sentiment in Catherine Pooler ink, Aquatini. I also added the plaid strip underneath the sub-sentiment for a little extra pattern play. The stripes serve as my large pattern, the polka dots as a medium pattern, and the plaid as a small pattern; and all of them work together cohesively. That’s it for my “her” card.
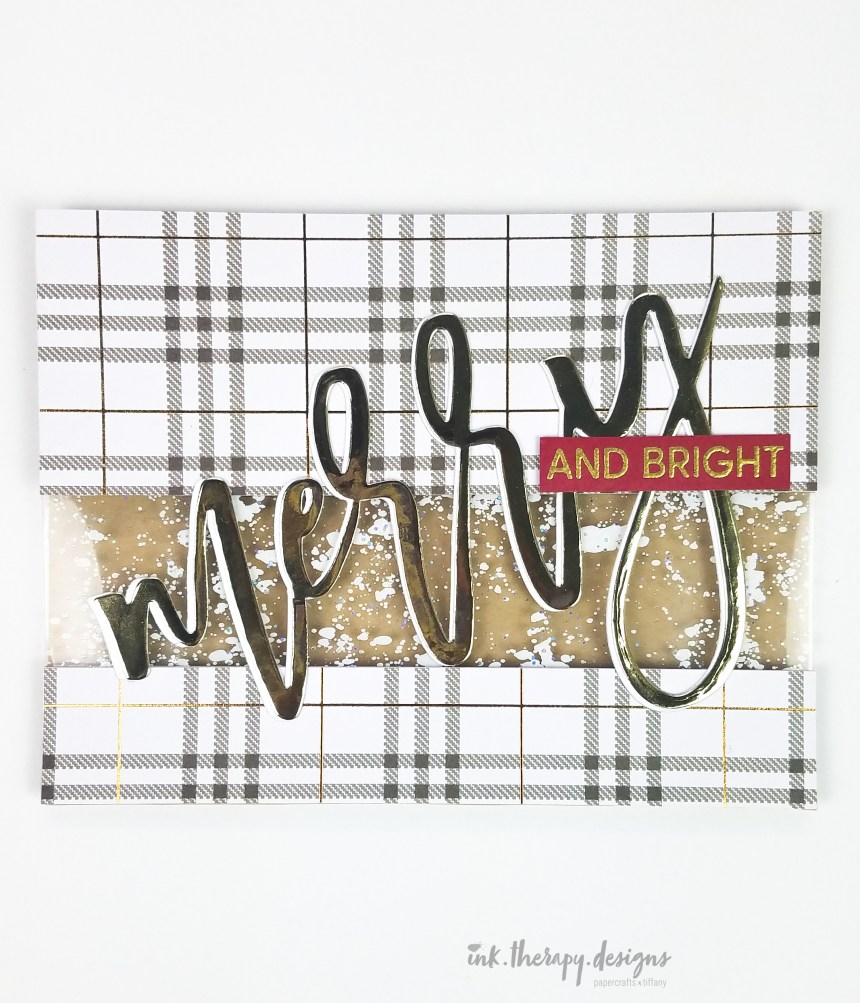


Merry and Bright. For my simple, but sharp “his” card, I used a leftover piece from a previous card that I did not write a blog post about (click the link to see a pic on IG). The previous card used a fun laminator technique that I learned from Jennifer McGuire. I won’t go into detail on how to reproduce the laminator technique as Jennifer’s video is great, but I added silver sequin and sparkly embossing powder in my laminator pocket to get this result.
On an A2 card base of kraft paper, I adhered a piece of pattern paper from the Memory Box Christmas Plaid paper pad. I cut a space in the middle to glue in my laminated strip. For the sentiment, I die cut ‘merry’ from white cardstock and gold foil paper and glued them together. I offset the gold and white die cuts to form a slight white shadow. Finally, I heat embossed the sub-sentiment in gold on a piece of red cardstock for a pop of color and glued everything together. Doesn’t the khaki, white plaid, and “snow” remind you of a winter Burberry ad? #classy! This was my first time making a more “masculine” card, and I’m so happy with the outcome.
If you’re inspired by my design, please tag me on IG, I’d love to see what you create. Thanks for stopping by and happy crafting!
.Tiffany.

I love how you incorporated pattern play into both cards.
LikeLike
Many thanks!
LikeLike