Project Overview
- Technique(s): laminator foiling, die cutting, floral arrangement, pattern play
- Product list:
- The Greetery, Merry Sprigs
- The Greetery, Signed & Sealed
- The Greetery, Signed & Sealed with a Kiss
- The Greetery, Hoop Wreath
- Thermoweb, Deco Foil in Gold and Rose Gold

Hi everyone! I hope you are having a great week. Only two weeks ’til Christmas, so I’m back with another holiday card idea, although this card can easily be adapted to work any time of year. Let’s dive in!
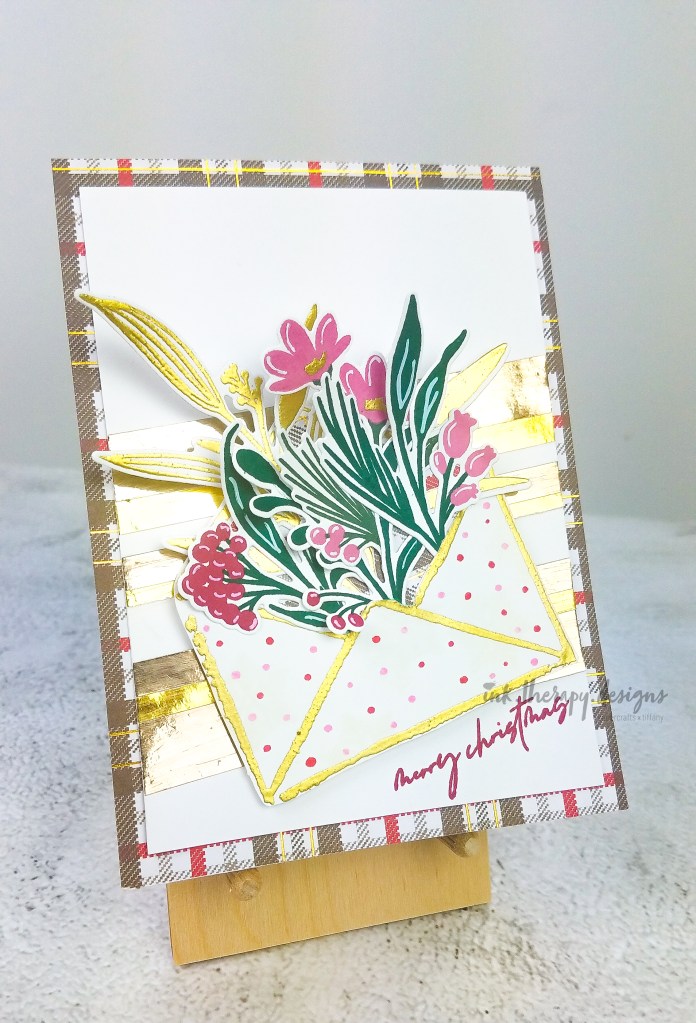
Background. I recently watched Jennifer McGuire’s video on cardstock strip techniques (another great video from the master), so I wanted to try her ideas, but put my own spin on it. Instead of using cardstock scraps, I wanted to piece together strips of foiled paper. Using Thermoweb’s toner sheets, I cut down two panels roughly A2 sized and foiled them. I foiled one sheet in gold and another in rose gold with my laminator. Using my paper trimmer, I cut strips of foiled paper in varying widths, glued them to a piece of copy paper, and pieced together my background panel as Jennifer describes in her video as the “lazy” way. I varied between gold, rose gold, and white paper strips.
Pro tip: Foiling in this manner usually works flawlessly, but when I started cutting strips, I noticed that some areas did not foil properly. Instead of starting over, I embraced the happy accident! I thought the imperfections added a little grunge to the shiny foil which was perfect because distressing and florals pair well. To add more texture, I rubbed my Mono sand eraser back and forth on all the foiled strips resulting in a cool brushed metal finish. Problem solved!


Envelope and flowers. I heat embossed and fussy cut the envelope. If I had the coordinating dies, it would have cut a slit for me to slide the florals into, but I used my craft knife instead. Although, it is mostly covered by the flowers, I lined the envelope with the same Memory Box Christmas plaid paper that I adhered to my card base. I stamped the floral elements with a variety of Catherine Pooler dye inks and added white gel pen detail for a finishing touch. I also gold heat embossed on greenery stamp from the Signed & Sealed with a Kiss to tie in the gold background. After arranging and gluing my floral arrangement, I backed the whole envelope with fun foam for dimension. Lastly, I added polka dots with two Copic Markers that closely matched the floral colors for an additional pattern. If you recall the tips on pattern play from my previous blog post, the stripes serve as my large pattern, the plaid as my medium pattern, and the dots as my small pattern, making the design cohesive and well proportioned.
Final assembly. I positioned and stamped the sentiment below the envelope in CP ink, Peppermint Scrub. I adhered the envelope to the background panel and then the panel to my pattern paper card base. Finito! A fun, shiny holiday card. The photos do not quite do it justice. Change out the colors and the sentiment and this could be used for Valentine’s Day card, springtime, summer, you name it.
If you’re inspired by my design, please tag me on IG, I’d love to see what you create. Thanks for stopping by and happy crafting!
.Tiffany.