
(*Affiliate links used whenever possible at no extra cost to you.)
Hi friends! I’m so excited to announce that I am joining the Ellen Hutson team as a Design Ambassador! I love Ellen’s collections and illustrators so I think it will be a fun year full of crafty inspiration! My first post as a Design Ambassador is all about Valentine’s or Galentine’s Day. Honestly, I am not a huge fan of Valentine’s Day as love should be celebrated all year around. But I love an occasion to send my girlfriends a little extra love, especially during this time we are all living through.
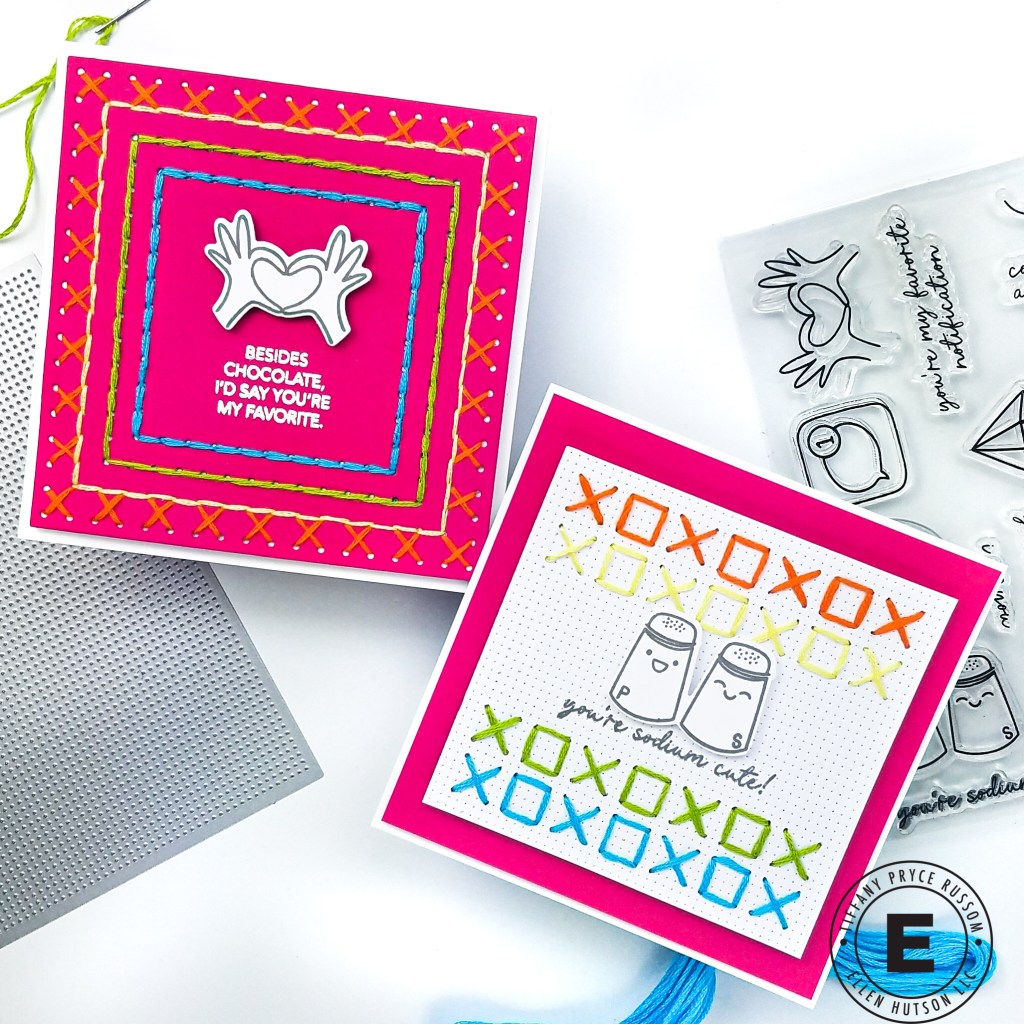
Because it is a new year, why not try new techniques?! I was recently bitten by the stitching bug (I know, I know, I am late to the party). I did not think I would take to this trend as much as I have because I have never been interested in stitching anything in my life, but I’m obsessed now, ha. If you have not tried it yet, trust me and give it a go! Even if you don’t think you would like it, try it. It is not hard once you get some of the basic stitches down. A great resource is the Essentials by Ellen Embroidery Guide and of course, Jennifer McGuire! I have two candy-colored examples to share, both using stitching as a background element.
Card 1
For my first Galentine’s card, I tried some different stitches for the very first time. If I can do it, I have complete faith that you can do this too! It does take a little time, but I love that you can stitch and watch tv or hang with friends at the same time. As with any skill, the more you practice, the better you will become. But I don’t think it has to be perfect. Imperfections give our handmade pieces character, especially with stitching.

STEP-BY-STEP INSTRUCTIONS:
1. Gather supplies – I used four different colors of DMC embroidery floss. Ellen Hutson has several colors in the shop. I also used a size 22 needle, but you can use whatever size needle you would like or have on hand. Each piece of floss comes with 6 individual strands. I pulled the floss apart and stitched with 3 strands for each color on this card.
2. Die cut the stitching panel. I used the Essential Squares for Stitching dies and the Essential Square dies to create a stitching panel. See the image below for how I placed each die. I die cut the panel from a piece of pink cardstock.

3. Stitch card – As I mentioned, I tried some stitches I have never done before. I liked that the different stitches added varying design/texture to each color. I think if I used thicker string, you would see the variation in stitches better. I used the following stitches:
- orange thread – cross stitch
- yellow thread – back stitch
- green thread – stem stitch
- blue thread – chain stitch
After finishing the stitching, I adhered the panel with foam tape to a 4.25 inch square card base, a new favorite card size.
4. Stamp and die cut an image from the Love Notes stamp set and coordinating dies. Adhere the die cut with foam tape. (Isn’t this stamp set the cutest?! It is perfect for this year’s Valentine’s cards.)
5. White heat emboss the sentiment from the Besties stamp set.


Card 2
For my second Galentine’s card, I did some very simple stitching to create the classic X’s and O’s.

STEP-BY-STEP INSTRUCTIONS:
1. Gather supplies – I used the same four colors of DMC embroidery floss and the same needle. This time, I used all 6 strands of the floss for a chunkier look to the stitching.
2. Using the A2 Piercing Plate 2, I die cut a piece of white cardstock.
3. Using the Essential Square dies, I die cut the panel again.
4. I stitched rows of X’s and O’s in each color of floss. I pierced larger holes for my floss using my die cutting “pokey tool” to make it easier to go through the cardstock.
5. Adhere the completed panel to pink cardstock and then to a 4.25 inch card base.
6. Stamp and die cut an image from the Love Notes stamp set and coordinating dies. Adhere the die cut with foam tape. Stamp a sentiment from the Love Notes stamp set in Catherine Pooler Twilight ink.


Hope you enjoyed the cards and found some inspiration to try stitching if you haven’t yet. If you make something inspired by these cards, I’d love for you to tag and follow me on IG. Thanks for reading!
Product list:


*Affiliate disclosure: I only use, review, and blog about products/companies I actually like and will continue to use. Some of the products shown on my blog use affiliate links. These affiliate links allow me to earn a small commission when products are purchased through those links. *This is at no cost to you!* Please do not feel obligated to use my affiliate links. If you choose to use these links, thank you so much! It helps support my blog and bring new content to you. Read the full disclosure on the about page.
