

The new card kit, Greetings from the Couch Card, is live! Head over to the MFT shop to add it to your cart. The card kit includes the following products:
Couch Potato Stamp Set
Fundamental Furnishings Die-namics
Potted Plants Die-namics
Take a Seat Die-namics
Finishes and Textiles Paper Pad
Card Stock – Smooth White (1), Cement Gray (1), Black Licorice )1), Kraft (1), Moroccan Spice (1), Candied Yam (1), Butterscotch (1), Sour Apple (1), Jalapeno Popper (1), Summer Splash (1), Cornflower (1)
The following will be available as a separate purchase:
Picture Window Die-namics
The Free with $60 releasing with this kit is Decor and More Die-namics. (You will want this die, it is sooo cute! It makes a bookshelf with all the things you might put on a bookshelf.)
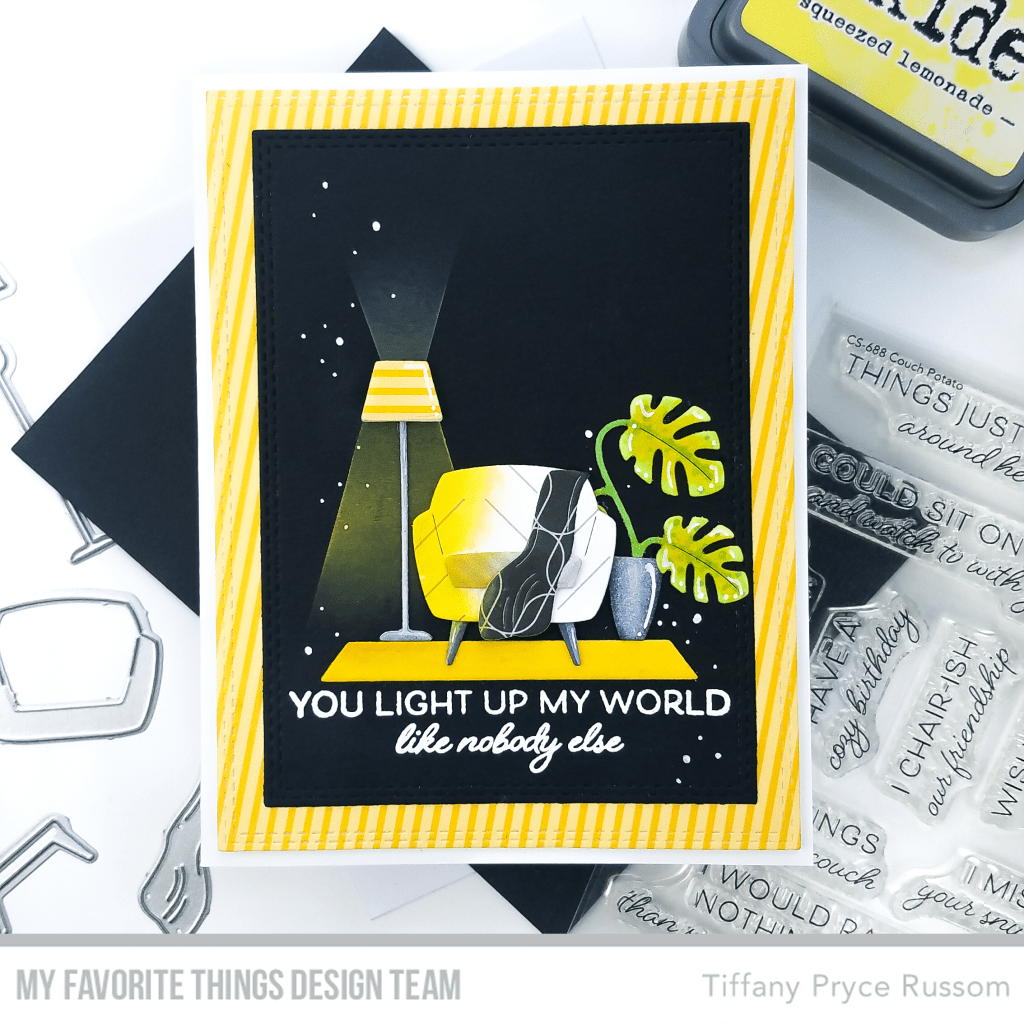
I had a blast making today’s card!! I just love coming up with new mini scenes with these dies. My favorite part is the shine from the lamp and the texture on the rug. I used yellow, transfer flock that I’ve never used before.
STEP-BY-STEP INSTRUCTIONS
- Die cut two layers with the A2 Double Stitched Rectangle STAX Die-namics. The base layer, attached directly to an A2 card base, is patterned paper from the Finishes and Textiles Paper Pad. The stripes aren’t normally slanted, but I die cut my panel at an angle so it changed the look of the paper. This is a simple way to change the look of your supplies. The smaller layer was die cut from black cardstock and adhered with fun foam.
- At the bottom of the card, white heat embossed a sentiment from Couch Potato.
- Die cut all of the card front pieces from white cardstock. The chair and blanket is from Take A Seat Die-namics. The lamp and rug are from Fundamental Furnishings Die-namics. The plant is from Potted Plants Die-namics.
- Color the plant and lamp with copic markers and added detail with a white gel pen. And die cut more patterned paper from Finishes and Textiles for the chair, blanket, and lamp shade. For the rug, I used a piece of yellow flocking for some fun texture. It feels like a velvet rug.
- For the “light” coming from the lamp, use masking paper to mask off an area above and below the lamp. Carefully ink blended yellow distress oxide ink for a light glow. Also, add yellow ink to the left side of the chair to carry the illusion of light further.
- Glue all of the living room pieces in place with liquid glue.
- Add faux splatter using a white acrylic paint pen. I usually love the randomness of paint splatter made with a paint brush, but I wanted more control this time around.


Hope you were inspired by this card! What part of the kit are you most excited about? Which die set will you use first? Leave me a comment and let me know! For even more ideas and inspiration, please visit the My Favorite Things YouTube channel.
Happy crafting,
Tiffany
I’d love to connect with you! Please follow me on IG and my blog, and reach out and say hi!
@ink.therapy.designs

Love this, thank you for the step by step instructions!
LikeLike
Thanks, Kim! Glad you like the card 🙂
LikeLike