
Happy Sunday friends! I hope you had a wonderful Thanksgiving with your loved ones. It was a quiet one in my home – just me and my husband as a few of my family members, including me, are still recovering from illnesses. My husband and I cooked our first Thanksgiving meal together, and surprisingly it was fairly easy. And of course, delicious! Enough about me, let’s talk about the new MFT card kit coming out on Tuesday. I know I say this about every kit, but you’re going to LOVE it. I am a big gift card/cash giver. My siblings and I are at the age where we just want cash so I can buy what we want for the holidays or birthdays ourselves. If you’re like me, and want a way to dress up your gift card/cash giving, stay tuned. This new kit plus add-ons are absolutely perfect for that and can be used all year long for SO many occasions. I promise you will love it!
Today, the design team is focusing on products in the kit itself. There are a *bunch* of add-ons for purchase separately that we will show off tomorrow. The kit is perfect for CAS, but adorable creations.
The Christmas Cash Kit includes the following products:
– Christmas Cash Stamp Set
– Price Tag Stamp Set
– Money Card Die-namics
– Christmas Complements Die-namics
– Feelin’ Festive Paper Pad
– Lip Balm Pouches
– Card Stock – Smooth White (3), Ripe Raspberry (1), Wild Cherry (1), Moroccan Spice (1), Caribbean Sea (1), Tropical Teal (1), Prickly Pear (1), Jalapeno Popper (1), Kraft (1), Black Licorice (1), Iridescent Rainbow (1)

STEP-BY-STEP INSTRUCTIONS
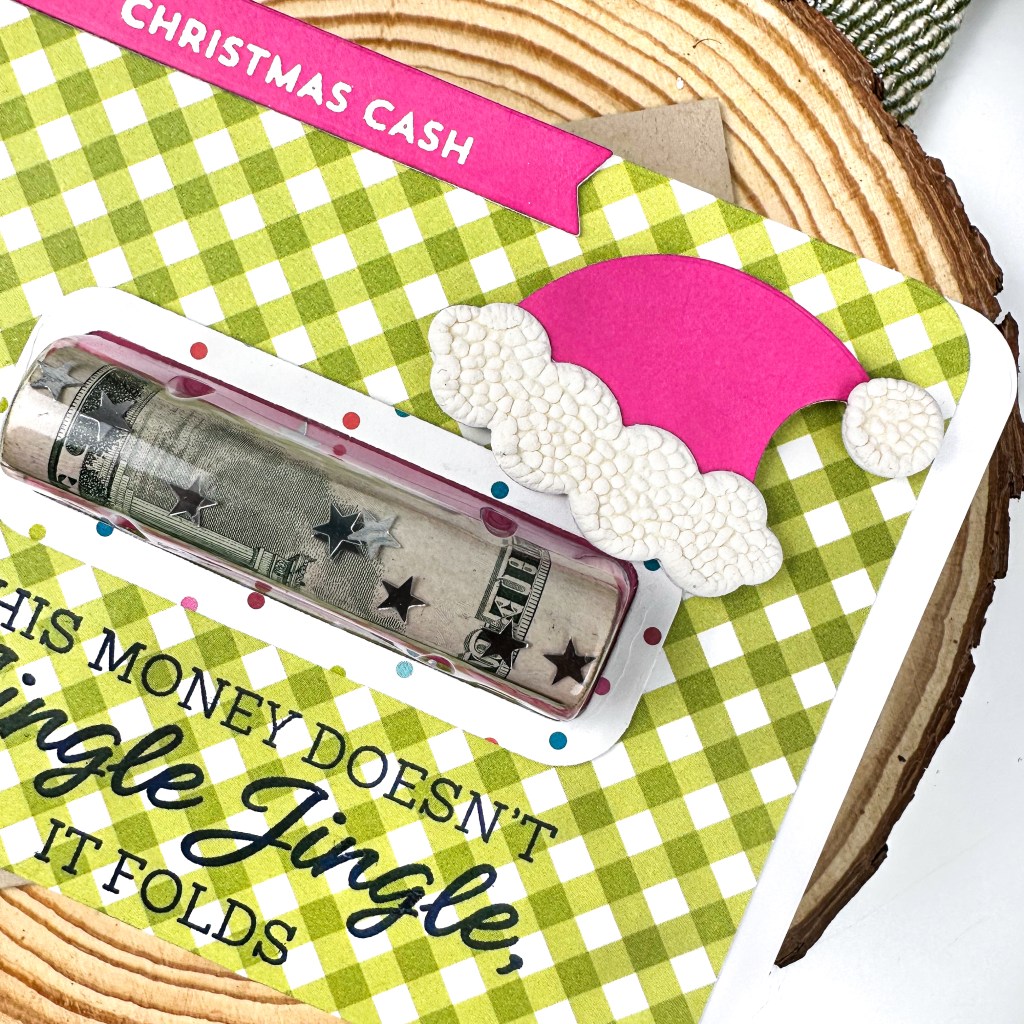
- Die cut a panel of white cardstock using the large, rounded rectangle from the Money Card Die-namics. This rounded rectangle is a full A2 size. Die cut another panel from patterned paper from the Feelin’ Festive paper pad. I die cut the panel from patterned paper again so I could make it a bit smaller.
- Stamp a sentiment from Christmas Cash in MFT Extreme Black ink. For anyone that knows the song and all the associated viral videos, you know this is hilarious 🙂
- Die cut the outer part of the lip balm pouch from patterned paper and adhere to the bottom of the pouch.
- On the inside of the pouch die cut a piece of Ripe Raspberry cardstock. Adhere in place.
- Roll up some money and place inside the pouch, along with some flat, shaker stars for a little extra something. Adhere the pouch down with temporary adhesive. I did not cover the entire thing so it would be easy to open up later.
- Die cut the dollar sign from black and the Santa hat from Ripe Raspberry cardstock from Christmas Complements. Add liquid appliqué and heat set to get that puffy, textured look on the hat.
- Die cut the sentiment banner and white heat emboss a sentiment from Christmas Cash.
- Adhere all of the elements in place.


This is a flat panel where you could write a message on the back. Or you could create this into a card by die cutting an additional panel, scoring it, and adhering the two together. Come back tomorrow and Tuesday for more inspiration with this upcoming kit release. As always, find more tutorials on the MFT YouTube channel.
Happy crafting,
Tiffany
I’d love to connect with you! Please follow me on IG and my blog, and reach out and say hi!
@ink.therapy.designs

What a novel idea! I love it! I also love the stamped greeting on your card. I typically send gift cards or cash for gifts and these dies would be perfect for that.
LikeLiked by 1 person
Thank you! Yes, I agree it is so unique! MFT kits are always so creative.
LikeLike
This is totally awesome!
LikeLiked by 1 person
Thanks so much!!
LikeLike