
(*Affiliate links used whenever possible at no extra cost to you.)
Hey crafty friends! I am so happy to announce that I’ve joined the Honey Bee Stamps Design Team! The designers are so, so talented and creative, so I am honored to be among them! The newest HBS release went live in the shop today and it is all things fall and Halloween – hence Falloween :). I encourage you to stop by the shop and see what’s new!
On my Instagram last night, I posted a sneak peek featuring a new Lovely Layers die set – Bat. This bat is oh so cute and simple to put together. The background was made using the Ranger/Tim Holtz seasonal mica sprays. They are on clearance in the HBS shop, so they are great price! I used mica colors in Halloween sets #1, #3, and #5. Today, I’m sharing another sample that was fun to create! I layered multiple products on this card, but it was easy as pie.

STEP-BY-STEP INSTRUCTIONS
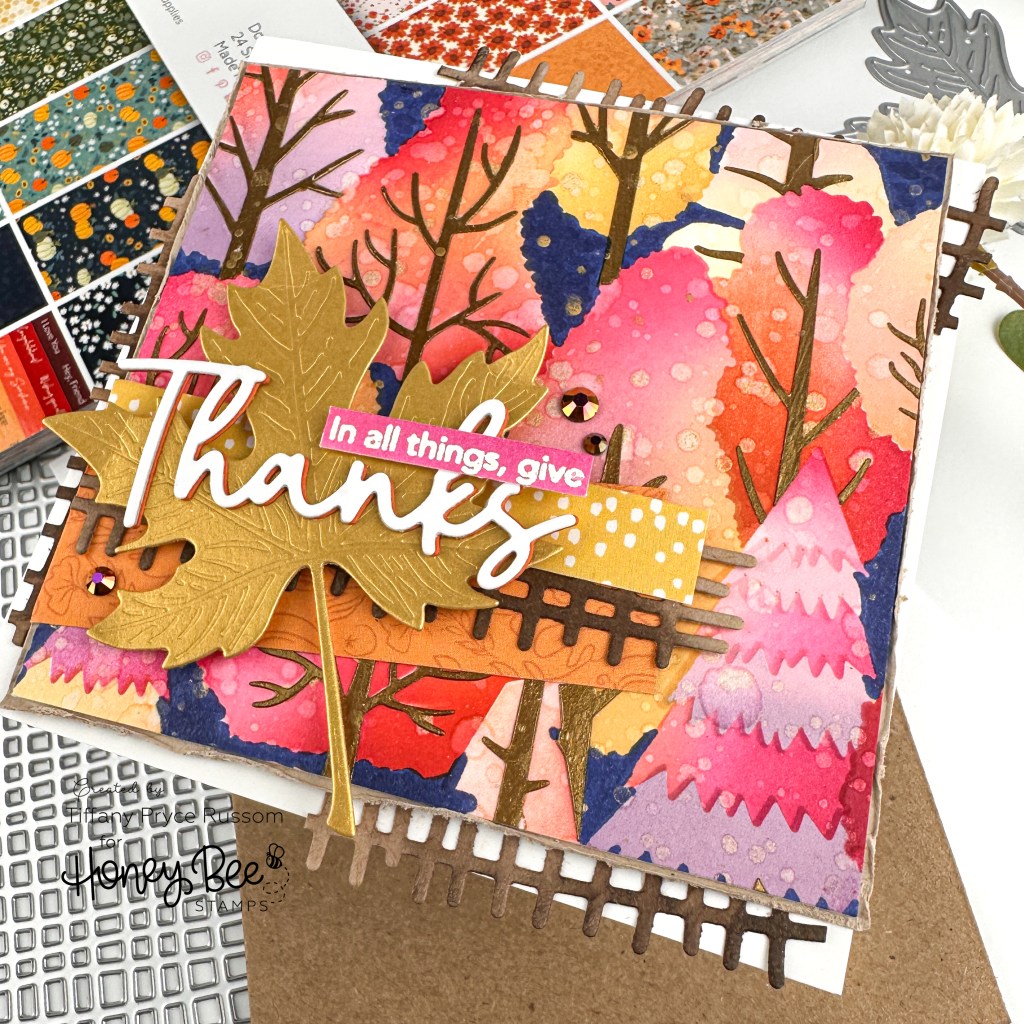
- Using a variety of Catherine Pooler spa ink colors, I ink blended the Colors Of Autumn background stencil on white cardstock. I used oranges, yellows, pinks, purples, and reds. There are 6 stencils in this set. You’ll want to be a little careful ink blending because there are delicate bits in the center of the trees for the trunk and branches. In the end, it did not matter that the interior of the trees shifted, but I wanted to let you know ahead of time. You could always use pixie spray to stick down the stencil temporarily.
- For the last layer of the stencil that fills in the branches and tree trunks, I used Lunar Paste in Gold Rush. After the paste dried, I trimmed it down to about 4×4 inches and splattered with gold metallic watercolor and clean water.
- To color the background between the trees, I used a blue copic marker – B39.
- I matted the stenciled panel with a panel of kraft cardstock. I distressed the edges of the kraft panel for a more rustic look.
- For the focal point of the card, I cut strips of patterned paper from Fall Is In The Air. I did not measure the strips, just whatever feels right to you, but the strips should be different sizes.
- For additional texture, I die cut a panel of kraft with the Burlap A2 Background. I randomly ink blended the die cut with brown dye ink to give it a little variation. I trimmed pieces of the burlap to add it underneath the sentiment and to tuck underneath the card front for an extra detail. I love little details and think they add up to create a special, unique card.
- Using the Lovely Layers: Fall Foliage die set, I die cut a leaf from brushed gold cardstock to use as the base for the sentiment. I popped it up with foam tape.
- The die cut sentiment is from Great Greetings- Everyday. I die cut and adhered a few layers together to make it more sturdy.
- The sub-sentiment was stamped and heat embossed. It is from the Mini Messages: Fall Sentiments stamp set.
- Adhere the card front to a square card base measuring 4.25 x 4.25 inches.
- Embellish with Fall Is In The Air gem stickers.

I just love the colors and shine of this card. Fall is my favorite season so be prepared to see much more from me. Hope you’re inspired to check out the new HBS release. Have a great day!
Happy crafting,
Tiffany
I’d love to connect with you! Please follow me on IG and my blog, and reach out and say hi!
@ink.therapy.designs
*Affiliate disclosure: I only use, review, and blog about products/companies I actually like and will continue to use. Some of the products shown on my blog use affiliate links. These affiliate links allow me to earn a small commission when products are purchased through those links. *This is at no cost to you!* Please do not feel obligated to use my affiliate links. If you choose to use these links, thank you so much! It helps support my blog and bring new content to you. Read the full disclosure on the about page.
