
Project Overview
- Technique(s): digital stamp, copic coloring, colored pencil coloring
- Product List:
I’m back with a new card I made using a digital stamp by Alex Syberia! I apologize for being an inconsistent blogger, I am juggling multiple priorities and crafting/blogging sometimes gets pushed to the bottom of my list. If my blog isn’t updated, please be sure to follow me on IG or you can nudge me to get into gear 😉
Have you tried digital stamps yet? They are easy to use and very versatile if you have access to a printer that can accommodate heavier weight paper. This card was my very first time using a digital or digi stamp, so I had no idea what to expect. As all good millennials do when we don’t know something, I scoured Google and YouTube. Unfortunately, I did not find many high quality, detailed tutorials on how to set up and use digital stamps. The best video I found was from Amber Rain Davis, @notableink (you should follow her amazing work if you aren’t already). She was actually the color inspiration for my final card design. Check out her blog and video on how to use digital stamps.
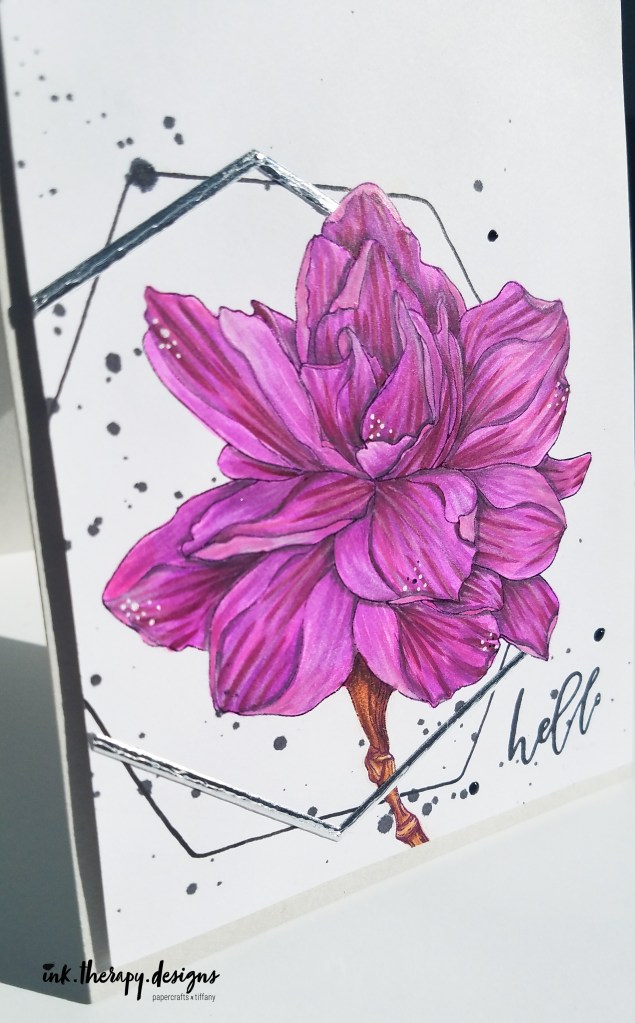
My basic steps for this card were pretty simple: 1. print, 2. foil, 3. color, & 4. assemble final card.
Step 1 – Print. If I am going to manipulate any image, I always import it into Adobe Illustrator first. Some people prefer Photoshop (like Amber shows), but I am a lot more comfortable in Illustrator. I know not everyone has access to these programs, but rest assured because I know you can also import these stamps into Word to get a similar result. I won’t go into much detail on how I set up my artboard and such because Amber already goes into that detail. I simply resized the flower to my liking and placed it on my document at a place of my choosing. Because I am printing an A2 sized area on a 8.5×11 sheet of 110lb Neenah Solar White cardstock, I had some leftover paper scraps after cutting it down. I don’t mind the scraps because I keep and use (or will use one day) everything. Hi, I’m Tiffany, and I’m a paper scraps hoarder curator.
Step 2 – Foil. Once I had my panel cut down, I foiled the entire image in purple Deco Foil. Because the image was printed using toner ink on my regular printer, I was able to foil it. I love foiling because it gives a beautiful shine and a little extra oomph. The lines on this digi stamp are fine, so the foil is only noticeable when tilted in the light. Check out my previous blog post which explains how I foil with an inexpensive laminator.

Step 3 – Color. My favorite part! I like to turn on some tunes and gather my favorite colors and just zen out. Because I did this card awhile ago, I don’t remember the exact copic colors I used (sorry!), but I know it was in the RV & V families. I used the flicking technique that Amber details. I flicked color from the base to the petal tip and also the petal tip to the base to mimic folds in the petals. I did traditional coloring where you start with the lightest color, create shadows and texture with the darkest, smooth everything out with the mid shade, and then do another coat of the lightest color to blend everything together. I usually repeat these steps to darken my coloring. I was careful to not overlap the foiled edges, but inevitably I did accidentally color over the foil. You can’t even tell, so I would not worry about it.
Another first in the creation of this card – layering colored pencils on top of copics! I used Faber-Castel Polychromos colored pencils, and they are great. Make sure your pencils are really sharp before you use them to get thin lines. If your pencil starts to dull, the pencil lines get more blurred and wide so there is not as much control in tight spaces (unless that is the look you are going for, of course). I used a mix of pink and purple pencils to create even more lines in the petals for a little dimension. I also used gray and dark purple to darken areas where the petals overlapped to mimic shadows. It is amazing how the flower came to life after I finished coloring. In case you were wondering about erasing over copies, I had no problem erasing errant pencil marks. Your alcohol marker should be completely dry before playing with pencils. I used opaque white copic ink to add the small white dots.

Pro tip: Leave some white, uncolored areas on your petals to give greater contrast to the highlighted areas. I did not do this in my coloring and had to work really hard to bring light back into the petals with a white colored pencil.
Bonus – I tried to color this flower three different ways! The purple you see above, red/pink, and yellow. I followed the same steps outlined above and just used different color families. Which do you like the best? I hope this inspired you to level up your copic coloring with colored pencils.


Step 4 – Assembly. To assemble the final card, I thought about elements that I love pairing with florals. A little metallic, a dash of grunge, and a splash of geometry – a perfect combo and elements that exemplify my aesthetic. I cut the Concord and 9th frame die out of silver mirror paper, drew another overlapping frame out of black pen, added some black ink splatter, and finally some black nuvo drops for subtle, added dimension. One thing you may notice about my designs is my love for small, extra details. I pride myself on noticing the little things so I hope you see that shine through.
What do you like the most about digi stamps? What do you like least? Is there anything in particular that you’d like to learn about regarding digi stamps? Please reach out to me and let me know!
If you liked this card or have any feedback, please let me know on here or on IG! If you’re inspired by my piece, please tag me so I can see what you create. Thanks & happy crafting!
.Tiffany.
