
(*Affiliate links used whenever possible at no extra cost to you.)
I’m sharing more inspiration using Spellbinders’ amazing Christmas in July release! Check my last blog post to see a little stitching in fun, non-traditional holiday colors using the Stitched Diamond Argyle die.
Today, both of my cards feature new glimmer plates with coordinating dies. They are perfect for CAS to more complicated designs and everything in-between. I combined each card with other Spellbinders products for added detail. See below for easy to follow step-by-step instructions.
Card 1: Blooming Tree

STEP-BY-STEP INSTRUCTIONS
- Trim a piece of patterned paper from the Christmas Traditions paper pad to 4 x 5.25 inches. Adhere to an A2 card base.
- Using silver glimmer foil, foil the Blooming Tree, flowers, and leaves on dark green cardstock. Die cut the tree, flowers and leaves with the coordinating dies.
- Color the small images with copic markers and adhere to the tree with liquid glue and foam tape.
- Die cut additional flowers and leaves from the Christmas Blooms die set and the Stitched Ornament die.
- Glue the large leaves to the card front and pop up the tree with foam tape.
- Foil the sentiment from Yana’s Christmas Sentiments on red cardstock.
- Embellish with Fashion Silver Embellishments.


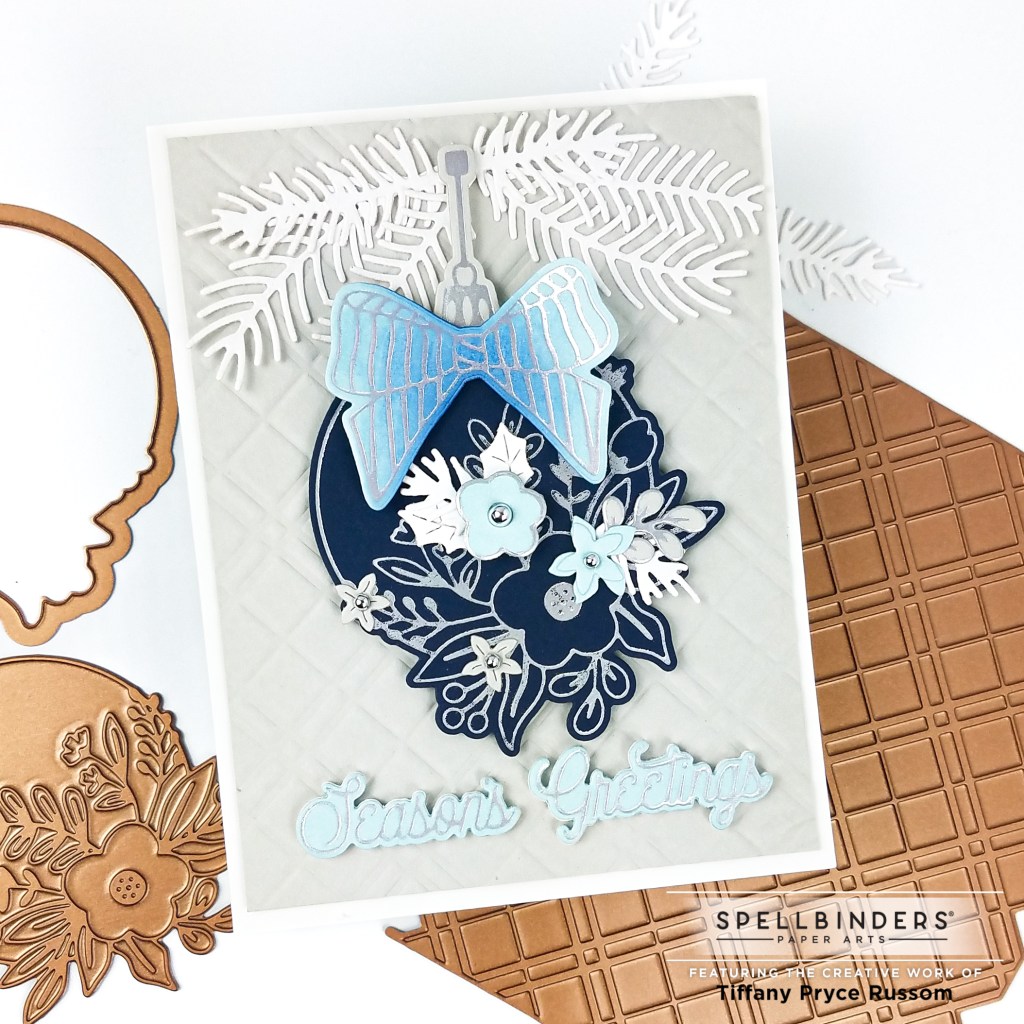
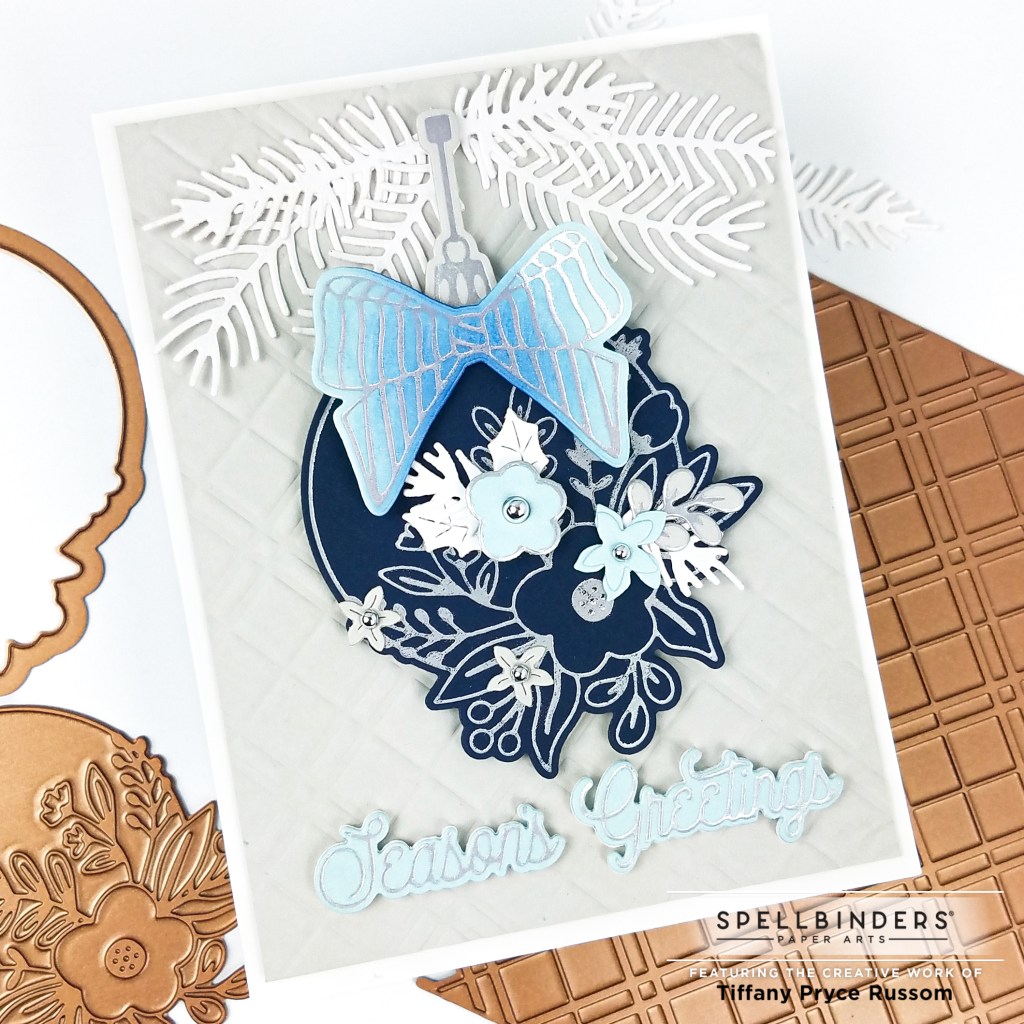
Card 2: Blooming Ornament
STEP-BY-STEP INSTRUCTIONS
- Trim a piece of light gray cardstock to 4 x 5.25 inches.
- Dry emboss the panel using the Plaid Tidings Background. Glue to the A2 card base.
- Using silver matte glimmer foil, foil the Blooming Ornament on Indigo cardstock. Foil the bow on light blue and the ornament hanger on silver. Die cut all pieces with the coordinating dies.
- Foil the small flowers and leaves from the Blooming Tree on light blue and light gray cardstock. Die cut all pieces with the coordinating dies.
- Lightly ink blend some blue ink on the bow for depth.
- Die cut additional flowers and branches from the Christmas Blooms die set.
- Adhere all of the pieces together on the card front, popping up the ornament with foam tape for dimension.
- Foil the sentiment from Merry Glimmer Sentiments on light blue cardstock. Die cut with the coordinating dies and adhere with foam tape.

Hope you’re inspired to check out these wonderful products. There is so much more inspiration on the Spellbinders blog. Thanks so much for stopping by and reading; I appreciate you so much!
Happy crafting,
Tiffany
I’d love to connect with you! Please follow me on IG and my blog, and reach out and say hi!
@ink.therapy.designs
*Affiliate disclosure: I only use, review, and blog about products/companies I actually like and will continue to use. Some of the products shown on my blog use affiliate links. These affiliate links allow me to earn a small commission when products are purchased through those links. *This is at no cost to you!* Please do not feel obligated to use my affiliate links. If you choose to use these links, thank you so much! It helps support my blog and bring new content to you. Read the full disclosure on the about page.

My brain ran out of steam around Monday this week and I just have not been thinking clearly! You are right, I do use the glimmer plates and everything. I have the Hammermill paper and the glimmer paper, I just need to sit down play to see if I can figure out a way to get a good foil. I’m just so spent after a stressful week of working that I don’t want to spend time trying to figure out crafty problems!!!! But… I will figure it all out one of these days. I have an older SB christmas foiling plat that I love and would like to make a few cards with it. Hope you have a great weekend.
LikeLike
OOOOHHHH, AAAAWWWW! So Pretty! I love using non-traditional Christmas colors. I can never get my foiling to come out very well (I even use all the same tools as Jennifer McGuire et al) and follow their guidelines. I’m sure there is a short between the chair and the foiling machine (user error)!!! 🙂
LikeLike
Haha, I have been experiencing issues getting a great, clean foil too! Have you tried adding more shims? Have you tried the specialty glimmer paper? It always foils perfectly, but it doesn’t take ink very well, unfortunately. I just bought a Platinum 6 (I have been using my old Big Shot) so I am hoping that will improve my foiling results. Thanks so much for your sweet comment! Holiday cards are some of my favorite to create 🙂
LikeLike
I have tried EVERYTHING!!! I have the Platinum 6, I have the glimmer paper. I’m wondering if maybe I might need a set of cutting plates that I only use for foiling and then a set that I use only for die cutting and embossing. It’s not ideal but it might be worth looking into! I am always die cutting and using embossing folders, so my plates are very well loved and that might be part of my problem. I’m going to save my pennies so I can buy the new conversion plates (silly bills keep getting in the way of my fun!).
LikeLike
Hmm, I wish I knew what I could do to help! I know you don’t use cutting plates in foiling. If you’re using the Spellbinders glimmer machine, you’d use those special glimmer plates that come with the machine which are different than your die cutting plates. I’m surprised even when you use the glimmer paper it doesn’t work. That paper is the best. I just wish it came in other colors than white. Keep trying!!
LikeLike